Wrapping out of the first semester I have many projects that I helped film. The one I spent the most time doing would probably have to be the district promo video. I wasn’t sure how it was going to turn out in the end, but with the superintendent’s approval, I’m confident in the quality of the piece. It was a lot of fun to film and I am looking forward to more projects like it.
Month: March 2014
Uncategorized
Week 6
by Contributor •
As of yesterday Drew and I have finished a script that we are now going to shoot and edit. The story is about a crime that takes place and the three perspectives of the people involved. I will have it filmed by the end of this weekend and edited by the time grades close. With Drew and I both editing this it should be done rather quickly.
Videomaker Article
HOW TO SUCCESSFULLY UTILIZE WARDROBE AND MAKEUP IN YOUR PRODUCTION
by Contributor •
Title: HOW TO SUCCESSFULLY UTILIZE WARDROBE AND MAKEUP IN YOUR PRODUCTION Author: Bree Brouwer Date: March 21st, 2014
 Making a video/movie is always people thinking about the tech and all the new gadgets and programs to make them the beautiful masterpiece people want, but the thing is that you could have all the best equipment but if your wardrobe and makeup isn’t up to par then you will definitely have visual problems.
Wardrobe- Avoid all extremes. Harsh contrasts in tone, sparkly attire like jewelry can wreak havoc on video camera sensors even if you do have one of the newer type of cameras. It will result in harsh rendering, wobbly lines, and glare. That is also known as the Moire effect. Dress slim, because people always say how the camera adds ten pounds, so dress flatter than your actors figures, but make sure it still works for their character. Stick with solid colors like pastels, neutrals, greens, and blues. Colors like orange and red might make it look like the actors are glowing. Also be careful with using white as it might work negatively with the camera
Makeup- Go for a natural look, a whole lot of makeup is for the theatrical productions, so leave it there. Both men and women should even out their skin tone while also not making them look washed-out on film. Remember to powder because just at least one small dab can make a huge difference on camera. Keep hair under control. Men should shave to avoid having five o’clock shadow, and women and men with long hair need to pull it back into a ponytail if it works for the character. Everyone should use hairspray to tame any loose hairs.
What to do when you are not sure- There are always people to hire to get opinion on the whole wardrobe and makeup you have going on or even people just to do it themselves so you don’t have to deal with it. Even if you don’t have the money to hire anyone, just make a good decision and test everything on camera before shooting for real.
All in all video production is truly the sum of all its parts and wardrobe and makeup is one of those elements that when done right, it can make your final work look like the masterpiece you want it to be.
Picture rights-
Bouwer, Bree. “How to Successfully Utilize Wardrobe and Makeup in Your Production.”Videomaker.com. Videomakers, 21 Mar. 2014. Web. 28 Mar. 2014. <http://www.videomaker.com/videonews/2014/03/how-to-successfully-utilize-wardrobe-and-makeup-in-your-production.>
Videomaker Article
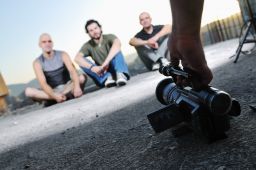
4 QUICK TIPS FOR CREATIVE CAMERA POSITIONS
by Contributor •
 Title: 4 QUICK TIPS FOR CREATIVE CAMERA POSITIONS Author: Chuck Peters Date: March 19, 2014
This article talks about how usually people keep the camera at eye-level which is about 5-6 feet high and that if you can change the camera angle dramatically then it can give the viewer unique and creative perspectives. It can give more interest to the scene then the same placement of shots.
Get down: Good creative camera work is all about finding different points of view that can help/look great. Kneeling or laying down to get a perspective of an ant, but in the industry it is known as a worm-eye view. What this does is makes what your filming look larger than life and many people haven’t seen what it is to see the point of view of their shoes.
Get up: Get on a scaffold, on top of a building or even a ladder. It can give the feeling of omniscience and make what you’re shooting look small. You can use up high type of shots and intercut them with ground level type shots and that would look good.
Inside out: Cameras can go many places that a human holding a camera can. So you can place it in some very precarious positions. You could put a camera in the fridge when someone goes for a late night snack or in a mailbox for when a mailmen delivers a letter. That can give a different type of view that will mix up your shots and look great.
Slide to the side: A lot of shots at eye-level can easily be changed so easily by slanting them to change and give it an uncomfortable, even anxious type of feel. If that is what you need/looking for then it would be perfect.
” The ultimate takeaway is this: don’t just shoot every shot from eye level. Look for opportunities to employ creative camera positions, and be selective about perspective.”- Chuck Peters
Picture rights-
Peters, Chuck. “4 Quick Tips for Creative Camera Positions.” Videomaker.com. Videomakers, 19 Mar. 2014. Web. 24 Mar. 2014. <http://www.videomaker.com/videonews/2014/03/4-quick-tips-for-creative-camera-positions>.
Uncategorized
Videomaker Article – March 14th, 2014, By: Jennifer O’Rourke, March Issue 2014 Article Title: Nikon 1 V3 Mirrorless Cameras with Improved AF and Fast Continuous Shooting Announced
by Contributor •
In this article it talks about lenses for cameras, and how they can keep sharp focus even on objects that are moving. It also talked about mirror-less cameras that are lighter, and smaller, plus, they take great footage. Lastly, this was based on the Nikon, V3, which is the new lens for staying in focus even when the objects are moving.
I learned from this article, the different lenses of cameras, and their effects. How I could apply this to class is, I don’t think I really could use this in class unless we had those special lenses for the camera.
To read the article, here is the link: http://www.videomaker.com/videonews/2014/03/nikon-1-v3-mirrorless-cameras-with-improved-af-and-fast-continuous-shooting-announced
Videomaker Article
Making videos using 7000 post it notes
by Contributor •
We all know what post it notes are as they are a useful tool for jotting down notes for classes, studying, TV shows, or just general ideas you though were important. This guy was able to use his knowledge in Final cut pro and 7000 post it notes to make an awesome stop motion animation of Mario and Pacman.
Zach King a member of the youtube community who built his channel from Final Cut tutorials. His information he posted was useful on real life videos such as Real Life Portal Gun and Jedi Kittens which also gave him credit. When he had a big enough audience he decided to use his experience to make a stop motion animation using 7,000 post it notes and a home made dolly camera.
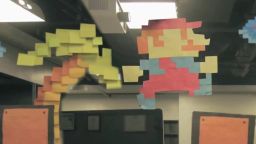
He said that recreating one minute of video would mean taking 1,440 individual photos. He also said that unlike traditional videos stop motion animation is much harder to produce. Usually videos are at 24 frames per second, to recreate this aesthetic video you’ll need to re-create each individual frame.
This article will be useful when if I choose to make a stop motion animation video, because it gave me an example of how long a stop motion animation is. I also thought that it was just pretty cool.
http://www.videomaker.com/videonews/2014/03/how-to-make-a-video-using-7000-post-it-notes
Videomaker Article
WonderRig Elite DSLR
by Contributor •
You’ve seen those amazing videos that are stable and don’t have any shaky shots and wanted to create one of those videos, but only had shaky shots well now all your looking will come to a halt. You won’t need to search any longer because with the WonderRig Elite DSLR you won’t have anymore shaky shots.
First let us talk about what you’ll get for materials before you go and spend your money, The WonderRig Elite DSLR will include these items; shoulder support stabilizer, reversible follow focus, 15mm rod system, matte box and a shoulder accessory support pad. The materials are made of metal except for the matte box and barn doors which are made of hard plastic.
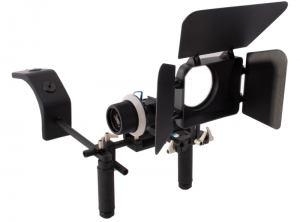
Right now you may be thinking WOW! I need to go get this now, but with the WonderRig Elite DSLR there are both strengths and weaknesses just like every other thing in life. It’s strengths include; Metal construction, quality follow focus and it’s weaknesses include; grips slip under any type of strain and the shoulder support isn’t made for everyone.
For more information please read WonderRig Elite DSLR Video Rig Review at http://www.videomaker.com/article/17073-wonderrig-elite-dslr-video-rig-review an article Chris Monlux
Picture taken from http://www.videomaker.com/article/17073-wonderrig-elite-dslr-video-rig-review
Weekly Progress Report
Week of 3/21
by Contributor •
Tried to organize and recover equipment for the program, next week i will try to put out a webcast for I’m not sick anymore. Will try to organize equipment with labels so we have a system to rely on to know what is signed out where, so there shouldn’t be a confusion of where stuff is.
Weekly Progress Report
Week of 3/14
by Contributor •
Finished critiques for Star Wars Episode IV: A New Hope, Indiana Jones and the Raiders of the Lost Ark, and my promo video. I’m still waiting for my dad to pick out the select few songs from the video for me to edit further. Will try to do a web cast this weekend, cold, and schedule permitting. If nnot then will try to get 1-2 out before the end of the quarter.
Uncategorized
Green Screen Improvements
by Contributor •

Title: 5 Green Screen Tips
Author: JR Strickland
Published November 29, 2013
Five things to keep in mind when using green screen is camera angle, lighting, props and sets, blocking, and panning. Don’t just stand directly in front of the camera and stare into it unless it’s necessary, it’s boring and usually looks bad. Keep the actor moving, with reason, and using props will help make things look more real and interesting. Plan out your background and how you want everything to look, also make sure you tell everyone you’re working with.
Do to the fact I’ve never used green screen this is all new information and things I never even thought about before. I probably would have had the actor not interacting with much because I thought it would show how unreal the background is. I’m still not so sure about lighting, I’ll probably have to play around with it to really understand how it works with green screen.
I hope to use green screen before the end of the year and I’ll try to keep in mind not using it when I don’t have to and adding plenty of props and different camera angles.
http://www.videomaker.com/videonews/2013/11/5-green-screen-tips