Category: Videomaker Article

WonderRig Elite DSLR

You’ve seen those amazing videos that are stable and don’t have any shaky shots and wanted to create one of those videos, but only had shaky shots well now all your looking will come to a halt. You won’t need to search any longer because with the WonderRig Elite DSLR you won’t have anymore shaky shots.

First let us talk about what you’ll get for materials before you go and spend your money, The WonderRig Elite DSLR will include these items; shoulder support stabilizer, reversible follow focus, 15mm rod system, matte box and a shoulder accessory support pad. The materials are made of metal except for the matte box and barn doors which are made of hard plastic.

323-C5-Wonder-Rig-PRIMARY


Right now you may be thinking WOW! I need to go get this now, but with the WonderRig Elite DSLR there are both strengths and weaknesses just like every other thing in life. It’s strengths include; Metal construction, quality follow focus and it’s weaknesses include; grips slip under any type of strain and the shoulder support isn’t made for everyone.

For more information please read WonderRig Elite DSLR Video Rig Review at http://www.videomaker.com/article/17073-wonderrig-elite-dslr-video-rig-review an article Chris Monlux

Picture taken from http://www.videomaker.com/article/17073-wonderrig-elite-dslr-video-rig-review

4 BACKGROUND TIPS TO MAKE YOUR ACTION CAM VIDEO LOOK PROFESSIONAL

Title: 4 BACKGROUND TIPS TO MAKE YOUR ACTION CAM VIDEO LOOK PROFESSIONAL  Author: Brian Teal  Date: March 04, 2014

bg2_0This article states how you can make an awesome looking background for an action scene without using a green screen and using the natural terrain. Brian teal states “It just takes a little setup before shooting your HD video.” All of which making it look cooler then some green screen background compared to the real outdoors.

1. Use the weather to you advantage. Use the natural light to light up your shot or if their is a misty background the darker colors will stand out to the audience and look better and out the focus on him. With something like having a bright sun the trick is to angle it correctly so the sun doesn’t take away from what you are trying to film and getting it to look good, but it done perfectly then it looks amazing.

2. Use backgrounds to show different angles. Like if you see something in the background you would like to include don’t just want a basic shot find something around like a log, stump, rock, or even the ground to give a different angle with what you want in the background and liven up your shots a bit.

3. Realize whats in your background. Make sure you take a trial run if you plan on panning or moving your camera in anyway ad there might be something that could come up that could block your view or be in the background that you don’t wan. What if you had a great take and you mess it up because you didn’t check your surroundings, like Brian teal says “Don’t be a victim of an unsuspecting photobomb, especially from an inanimate object!”

4. Preform a trial run. Have the actors or person that you are filming do a practice run. While you are filming the way the background interacts with the camera and the actor might need tweaking, like is the background not working well and causing you to not film what you want. All in all use it just to make sure everything looks great!


Pictures rights:

Teal, Brian. “4 Background Tips to Make Your Action Cam Video Look Professional.”Videomaker.com. Videomakers, 04 Mar. 2014. Web. 14 Mar. 2014. <http://www.videomaker.com/videonews/2014/03/4-background-tips-to-make-your-action-cam-video-look-professional>.


LIGHTING VIDEO: FIVE IMPORTANT ASPECTS OF ANY LIGHTING SETUP

imgres-11Title: LIGHTING VIDEO: FIVE IMPORTANT ASPECTS OF ANY LIGHTING SETUP Author:  Chuck Peters   Date Published: March 04, 2014

This article speak about how you can go and buy a new camera, a very expensive camera but all it will do is show out flaws of your video making even more especially if you don’t have good lighting quality and talking about how lighting can make a film much better then with amateur style lighting. Don’t worry as much about what your shooting with but what you are shooting at.

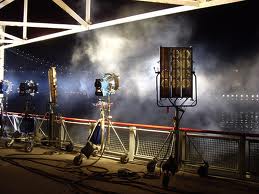
Things that will make your lighting better are for starters, the position of your lights just by adjusting the length, direction and angle of shadows that it creates. A light source positioned near the video camera creates what is known as flat lighting. Flat lighting is low on the creativity scale, and neutral in terms of emotion. As the light is moved farther to the side of the scene it becomes increasingly more dramatic and emotional.

The brightness is also a factor. You use a lot of light, Known as High key, and everything is brightly lit. That would be used to show a happy upbeat type of seen. Then there would be low key which is more dramatic and make it more dark by there being lower levels of light.

There are also the different qualities of lighting like Hard light bring out wrinkles and noticeable things upon their face and make a subject look strong, or scary. Hard lighting can also a subject seem intimidating if that is what you are searching for. Soft lighting is opposite of this as you can imagine by the names. Hard light pulls out the angular features of a face and draws attention to wrinkles and creases. It sort of hides wrinkles and things like that and make people seem more approachable and friendly. It really all depends on what you are trying to portray.

There is also the shape of light which is controlling and focussing the light to what you want it to show. Light shouldn’t just wash over everything. It should be put in separate places and mostly were its wanted, to show depth in your film.

Lighting color is an important factor of how you can change the lighting to like lets say yellow or amber to give the scene more of a warm feeling or of just sunset or sunrise. Many different colors can make it seem different like light blue can make the scene look like it winter and there are so many more. Shots can be tweaked by using a small amount of color and it changes the whole aspects of the scene.

So overall for this article chuck peters the author of this article who is a 3-time Emmy Award winning producer says it perfectly here with this statement “Give careful consideration to your lighting setups. The secret to shooting fantastic footage isn’t to buy a better video camera, it’s to take greater control over what happens in front of the video camera’s lens.” I couldn’t of said it any clearer and better then that.

Rights of picture:
Peters, Chuck. “Lighting Video: Five Important Aspects of Any Lighting Setup.”Videomaker.com. Videomakers, 04 Mar. 14. Web. 07 Mar. 2014. <http://www.videomaker.com/videonews/2014/03/lighting-video-five-important-aspects-of-any-lighting-setup>.


GoPro Hero3 (Black Edition)

Have you ever wanted to record yourself snowboarding down an intense hill, but didn’t want to carry 10-20 pounds of camera equipment well with the GoPro Hero3 Black edition you won’t have to worry about things like that again.

The GoPro Hero3 Black edition weighs at 4.8 oz, it’s also small enough to fit into your pocket or bag. The GoPro Hero3 Black edition has so many different features that are very useful in your expedition or trip. If you want to record yourself going on a motorcycle trip you can even attach the GoPro onto the front of your motorcycle with the suction cup attachment.

321-C5-GPHThreePlus-PRIMARY_0

Picture from http://www.videomaker.com/article/17243-gopro-hero3-black-edition-review

Over the years the GoPro has been getting upgrades and the best part of the Hero3 Black edition is that it has a stronger, faster wifi built into the camera itself. The Hero3 Black edition also comes with a wifi remote that can be used to start and stop filming up to 50 different cameras at a time.

After a long day of filming you need to bring the film itself and upload it to a major editing software to get your footage together how you want it. Though you don’t need to pay money for the editing softwares because the Hero3 comes with a free software to help convert your footage and edit it.

For more information please read http://www.videomaker.com/article/17243-gopro-hero3-black-edition-review by Adam Vesely

Green Screens

Have you ever lived in one location, but wanted to visit another, well with a Green Screen you can do so. The many wonders of the Green Screen is you can have the illusion of actually going to any location in the world or universe within a few seconds with Green Screens, without actually going to that location.

You can do many many things with the Green Screen, but why the color green, why can’t we use blue or even red. Well you can use other colors, but green is the best color to use for it beats blue, one of the more common screens, because green isn’t a color that is worn everyday by actors, so you could put green spots on the actors clothing and there’s be a hole in there body when you added the background.

Some of you may be asking “What do I need to get for a Green Screen” well I can tell you that you’ll need a Green background, bright even lighting and a tripod to lock your camcorder in place. For the Background you could either get bright green cloth (straight and flat) or you could paint a smooth wall with a gallon of dinosaur green from the kids section. For the lighting it could be tricky to get bright even lighting, but as long as you have two different lighting sources that are moveable you should be all set.

01


For more information please read the article How Does Green Screen Work by Chuck Peters. http://www.videomaker.com/article/17026-how-does-green-screen-work

Images from http://i1.creativecow.net/u/171549/01.jpg

Mobile Apps for Video Producers: Montaj, Lapse It, Pinnacle Studio for iPad and Movie Slate, Videomaker article

The issue for the article I’m doing a review on is the March 2014 issue of Videomaker magazine.  The article was written by Chuck Peters.

In this article it talks about the different apps you can now get to make videos.  They’re all different from each other, because they each do different things. Some of the apps it talks about are ones such as, Lapse it.  This app allows you to make a time lapse video where it takes different shots over periods of time and then puts it into a cool video.  Another one of the apps it talked about was Montaj.  In this app you can take multiple 5 second shots and then add music to make a music video, there is also the option of different colored filters, etc.  There was a couple more apps that were for video in which they help you find your footage easily without having to search for a long time.Screen Shot 2014-02-24 at 9.27.28 AM

Another one is really good for editing.  I learned from this article that it’s easy to get apps for video making and what some helpful ones are.  I can apply what I learned from this to class by, if I were to get any of these apps I could use them as practice before doing projects.
Here is the link to this article: http://www.videomaker.com/article/17246-mobile-apps-for-video-producers-montaj-lapse-it-pinnacle-studio-for-ipad-and-movie-slate

Videomaker Article-SOUND ADVICE: VOICEOVER TECHNIQUES

Title: SOUND ADVICE: VOICEOVER TECHNIQUES  Author: Hal Robertson Date: May 2002

0_23-1This Article talks about how with whatever you do for editing one time if not more you will need to do a voiceover for something and unless you have have money to buy professional voice actors and studio grade equipment, then the little things that could help.

First and foremost is to have a well designed script of what will need to be said. Like the article states “Not only is the script the blueprint for your video, it’s also the roadmap for those parts of the program that require a voiceover.” So it is extremely important to have it well written. Make sure that everything is grammatically correct, your phrases are easy to pronounce, and it sounds good. No mater if you perform the script yourself or use someone else, read the script out loud a few times and listen for clumsy words and phrases. Make edits to what you think would need to be changed. The reader of the script will be very happy you did so.

The voice is the second thing you are going to need, you first have to decide if a male or female voice is what you are looking for. Are you looking for an High-octane professional type of voice or a relaxed and laid back type of styled voice. Either type of voice you are looking for this article states how if you look around your area there are probably people who would be able to do this for and if your not wanting to spend money there are probably some who would do it just to get a copy to have a demo for their future endeavors or you might just to have to do it yourself and hope you are what you are looking for.

The rest of this article really just talks about equipment that you can buy cheaply but work well and that you don’t need $1000 equipment to make it sounds good even though its nice if you have that type of money and equipment. It also talks about how during the editing process of the voiceover the ability to cut out sniffles, coughs or awkward pauses and make it sounds so much more professional. Also the voice modifications that you can do like deeper voice or different things like that to change the voice to make it more of what you were looking for. Voice overs are bound to be needed no matter what and it just matters how you approach it and treat it just as important as everything else so you do a good job as bad voiceovers can ruin a film/video.

Picture courtesy of: Robertson, Hal. “Sound Advice: Voiceover Techniques.” Videomaker.com. Videomakers, May 2002. Web. 24 Feb. 2014. <http://www.videomaker.com/article/8860-sound-advice-voiceover-techniques>.

VIDEO EDITING: GO WITH THE FLOW

Title: “Video Editing: Go With The Flow” Author: Bill Davis  Magazine Issue: July 2002

images-9This article talks about how a well edited movie can easily “hypnotize” your audience and cause them to just be focused on nothing but the movie just by having great editing even if the plot, acting and other things are not up to par.

The main thing this article talks about it how when editing and putting shots together and going from a moment to moment type of sequence that you can’t leave stuff out because what you see in your head might not what the audience is thinking in their head and thus changing the thought of how that scene progressed and possibly changing the story, but with like everyday things like opening a door, you could probably not have the one quick snippet scene of him/her opening the door handle as many people know what would be happening. Either way it would just make it simpler if you just kept all the little things even if it does take more time in the editing process because by making have a break in the action where certain things are not shown it my take the audience out of that “trance” they are in by amazing editing just by leaving one little things out that could of easily stayed in the film. Obviously though you don’t want a whole lot of unnecessary scenes. “The rule of thumb for scene pacing is the same as in all good moviemaking: if it doesn’t help the audience follow the action or help move the story along, get rid of it.” With what you do put it in make sure you trim and edit to perfection as the editing of a film is crucial to a successful film.

Picture courtesy of: Robertson, Hal. “Video Editing: Go with the Flow.” Videomaker.com. Videomakers, July 2002. Web. 24 Feb. 2014. <http://www.videomaker.com/article/8948-video-editing-go-with-the-flow>.

Using Color for Amazing Video

I recently read the article “Camera Lens Filter Buyer’s Guide” by Carl Zeiss in Videomaker issue October 2013.

Photo of a blue lens filter on a Canon DSLR

This article is talking about using different filters and what ones are better to use then the others.

I want to use filters. “These can be fun for dream sequences!” “Diffusion filters are even dreamier, as they soften a subject and add a creamy-dreamy look to an image.” “Filters are essentially pieces of glass or plastic placed in front of a camera lens to change the look of a shot or add a layer of protection between the lens and the elements.” These are Some popular filter brands are Tiffen, Canon, Carl Zeiss and Nikon Page 32

Camera Lenses

I’m sure we all had one of those days when we went out to buy a camera lense and you bought the wrong one or it didn’t do what you thought it would. Or maybe the lenses only made videos with terrible quality, but this is where all your struggles come to an end. With these handy tips you won’t have one of those issues again.

For most Camcorders they come with certain lenses that can’t be interchangeable with other lenses which leaves your options extremely limited. You could go out and buy more camcorders for the different lenses, but that’d be extremely expensive. Instead of doing that you should go and get a DSLR or a newer camcorder with interchangeable options.

To really know if you’re getting a good deal or not, you should learn some terms like the prime lens and the zoom lens. The Prime lens is considered the most used camera lens in the DSLR kitbag. Though the prime lens can’t zoom, it’s less complicated to use, on the other hand zoom lens’s do exactly what the name suggests. They allow the camera to zoom in on certain shots, but they are more complicated and can be harder to use.

dsc03697

http://uberpix.wordpress.com/2009/11/30/the-eye-of-the-camera/dsc03697/

Focal length shots are crucial for most shooting pieces so you need to know which does which. Lenses with 24mm or less shoot a very wide field of view, lenses with 24mm-35mm shoot wide angles, they are mostly used to capture landscapes.

For more information please consult http://www.videomaker.com/article/17183-camera-lenses-buyer%E2%80%99s-guide an article made by Randy Hansen.