Hello Ramblers! Welcome back from summer! Spencer here, up in Bangor at the New England School of Communications. While I’m no longer able to be there and work with the rest of the Rambler Productions crew I plan on posting “Tips from NESCom” now and then to help you guys out with some pro tips. Today I thought I’d share a little of what I’ve learned recently, mostly just a few tips and tricks for using Final Cut Pro and a quick refresher on the conundrum of the “ND filter” on the GL2.
Forget what you know about basic editing. Forget about dragging clips from the browser to the timeline. Forget about dragging the entire project out of the way before inserting a clip into the middle…..
And learn the glory that is three point editing. (click for more)
If you are familiar with “in” points and “out” points from doing multiclipping this will be a bit easier. I’m looking at you Pat.
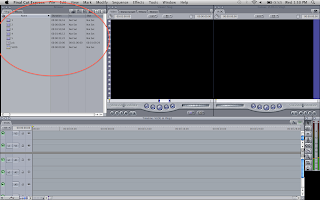
So here is your standard Final Cut workspace. No surprises here. I’m actually running Final Cut Express on my laptop but 99% of the controls are the same and none of the differences should be a problem in this tutorial. I’ve got a couple clips in the browser, a photo, and my sequence. These are actually the building blocks of the vlog you can find on my blog.
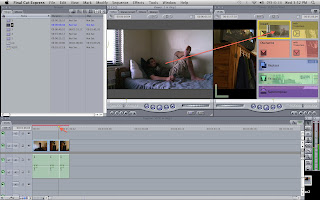
First off lets talk about “overwrite” and “insert.” Select the first clip you want from the browser. Now, instead of dragging that clip down into the timeline and over to the beginning of the project like we’ve always done double click on it and bring it up in the viewer (center window). Then, click and drag from the viewer over towards the canvas. A bunch of colored drop areas should appear (see below) labeled “Insert” in yellow, “overwrite” in pinkish red, and then “replace”, “fit to fill” and “superimpose” on the lower half. If you drag your first clip onto the “overwrite” and let go it will magically appear at the very beginning of your project. If you then position the play head on your timeline to any point and drag a clip over to “overwrite”, it will appear at that point.
Let’s say you do this a few times and have a few clips run end to end like below. Position your playhead in between two of the clips and then drag a clip onto the “insert” drop area.
Wham bam alakazam you have just inserted a clip between two others. You can do this in the middle of a clip too and it will make the cut and push the rest of the project down the timeline. I haven’t fiddled with the transition versions of insert and overwrite but I’m certain it isn’t that hard to figure out.
Now lets get into the real reason this is called “three point editing.” Let’s say you only want to insert a certain section of footage from a really long clip. We need to set some in points and out points. First select the clip you want and bring it up in the viewer. Find where you want the clip to begin. We need to set an “in” point here. There are two ways of doing this. One, simply hit the letter “i” when the playhead is where you want it. Two. hit the “in point” button located in the little circle in the picture below. The larger circle shows the in/out point indicators on the clip. Now we need to set the third point. The third point goes in the timeline. It can be either an in point or an out point. The program will match together whichever points there are two of. If you have two in points, they will line up. If you have two out points, they will line up. In the example below I’ve set an out point.
Now simply drag the clip from the viewer to the “overwrite” drop area. The clip will line up the end points and appear exactly where you want it. Only the portion of the clip between the in and out points will be put on the timeline. Bam, your efficiency has just increased by about 30%. The other three drop areas do exactly what they sound like they do. “Replace” replaces a clip on the timeline with one you drag in. “Fit to fill” can fill an empty place with a clip you drag onto it. If the clip is too small or large for the space, Final Cut will automatically adjust the speed to fit the space. “superimpose” places the clip on a layer above the other clips.
For those of you who have always wondered about the use of the “ND filter” button (near the manual focus button) on the GL2 camera here’s the gist of it. “ND” stands for “neutral density.” Basically, turning it on is like giving the camera a pair of sunglasses. It reduces the intensity of the light entering the camera. The ND filter should not need to be used indoors. However, on a bright sunny day it can prevent your shot from being overexposed.
I hope you’ve enjoyed this tutorial and I look forward to doing more! Let me know if anyone has any questions about Final Cut or the GL2. I have plenty of professionals here who can answer just about anything.
I hope to see some awesome projects!
-Spencer


Hello Spencer, it is I, another student from college. The whole "Tips from NESCom" is a great idea, and I think it might help students out.